The Photolemur 3 software “forced” me to do something I rarely do otherwise. I'm not usually a big fan of quick test reports and hectic article writing, but today it was necessary. The guys and gals at Skylum Software were kind enough to give me a free license to their latest update of Photolemur (version 3), so I'm one of the first to have a chance to check out this automatic photo editor to improve image quality. The software was launched in mid-September (2018), but I can already present you with a relatively extensive test report on the software.
Chapter in this post:
- 1 permanent discount with Sir Apfelot: Photolemur 3 with a 30% discount
- 2 What exactly does Photolemur do?
- 3 What is the difference between Photolemur 2 and 3.0?
- 4 My tests
- 5 My test environment
- 6 How intelligent is Photolemur?
- 7 sample photos and test results
- 8 Removal of image noise
- 9 Optimization of “underexposed” RAW photo data
- 10 Green space optimization
- 11 Dehaze: Automatically remove haze
- 12 improvement of vegetation
- 13 Eye Enlargement and Beautification
- 14 Optimizing skin and teeth
- 15 teeth whitening works!
- 16 Photolemur 2 and 3 in speed comparison
- 17 The styles - currently useless
- 18 My points of criticism
- 19 Criticism of the corrections by Photolemur
- 20 My conclusion: Is Photolemur 3 worth it?
- 21 demo version and discount code available
- 22 Similar posts
Long-term discount with Sir Apfelot: Photolemur 3 with a 30% discount
If you want to save a whopping 3% on the purchase of Photolemur 30, then now is your chance! I was able to negotiate a discount code “SIRAPFELOT” with Skylum, which saves you 30% on both the individual license and the family license. You just have to at checkout SYRAPPLE LOT enter as code. The code can be used indefinitely! ;)
► Order directly from SKYLUM and check offers: Photolemur 3 ◄
What exactly does Photolemur do?
If you want to read a little more about the software, just be my review of Photolemur 2 recommended. There I described in detail what the software does. For this reason, I would just like to briefly touch on the concept here: Photolemur does not offer itself as a competitor for Lightroom, Luminar or Photoshop, but is rather an alternative for all areas of application where you do not have the necessary time or muse, even for the whole To screw knobs to improve the image quality of a photo. The software gives you the option of optimizing a whole folder of photos at the same time to save yourself a lot of time. There is also Photolemur as a plug-in for Lightroom, Photoshop and Luminar to improve individual photos in advance without investing a lot of time.
If you think Photolemur is something like the "Auto" button in Lightroom, rest assured: The software does a lot more and actually analyzes the image content in order to selectively improve certain areas. In version 2, there were quite a number of aspects that Photolemur took into account:
- Improvement of the sky
- Color corrections
- Exposure compensation
- Remove image noise
- Remove gray haze from landscape photos
- Improvement of vegetation areas (leaves and grass)
- Reduction of JPG artifacts
What is the difference between Photolemur 2 and 3.0?
According to the mail I received from Skylum, the following points have been added to the new version:
- Automatic face enhancement with skin retouching and teeth whitening
- Intelligent eye enlargement
- Provide photos with ready-made styles (presets)
- New menu for setting the opacity (was already available in 2.3.1)
- Quick access menu for face enhancement, lens correction and eye enlargement
- Transfer settings from one image to all images as a batch process
- Export to SmugMug (for the Mac version)
- Performance and stability improvements
- Straightening the horizon (not yet available in my test version)
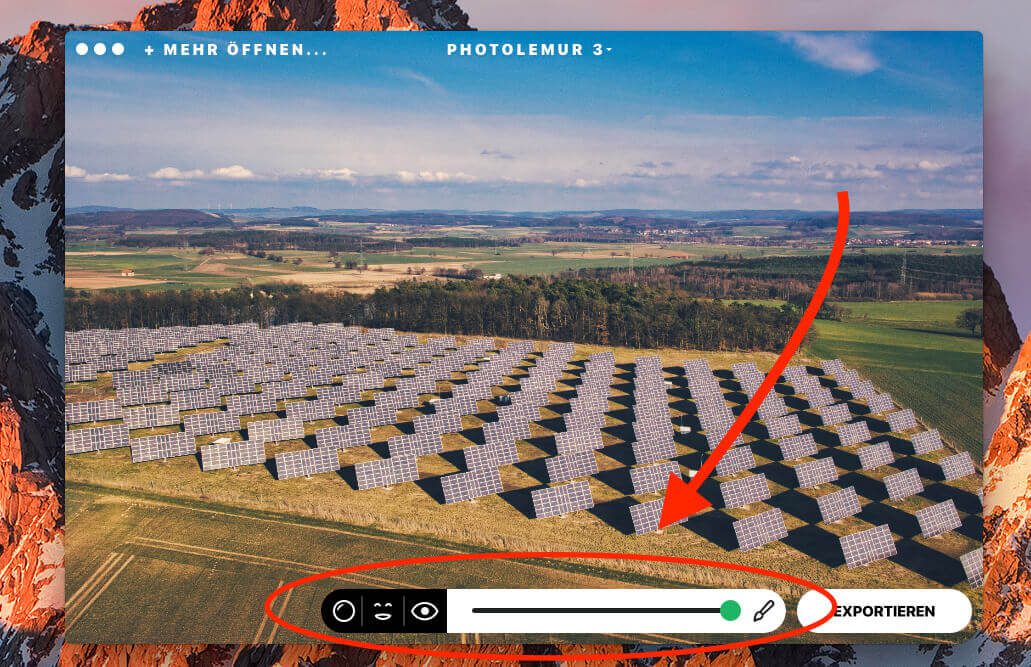
What I noticed right away during the first test is the style button in the bottom left of the image, which allows you to give a photo a predefined look. When you click on the edit pen, you also have the option of deactivating or activating individual optimizations such as face enhancement, lens correction and eye enlargement. This offers you more freedom to possibly prevent the “auto-correction” in one or the other portrait.
The slider with which you can set the effect of Photolemur on the photo from 0 to 100%, on the other hand, was already available in version 2.3.1 and was not new to me.
If you click in the overview with the right mouse button on a selected photo for which you have already made changes to the settings or styles, the button “Apply settings to all images” appears here. But be careful: there is no intermediate question. If you select the menu item, the settings are immediately copied to all other photos.
My tests
My test environment
I checked out Photolemur 3 on my MacBook Pro 2017 (2,9 GHz Intel Core i7 with 16 GB RAM). Why is it important? Because I also give information about the processing time, which you can perhaps put in relation to your Mac with such information on the computer. But I can already tell you: Version 3 of Photolemur has become a bit slower compared to Version 2 - probably because more analyzes are running in the background.
How intelligent is Photolemur?
A reader pointed out to me in my version 2 review that most automatic image enhancement tools are not really "smart". In his opinion, there is a very simple way to see whether there is intelligence behind it or an algorithm that increases or decreases certain values: You throw a photo into the app, have it improved, take the new version and put it back in the app, have it improved, etc. If it changes further after the first run, he would not speak of "intelligent". An intelligent app would check the current values and then make no further changes after the first run.
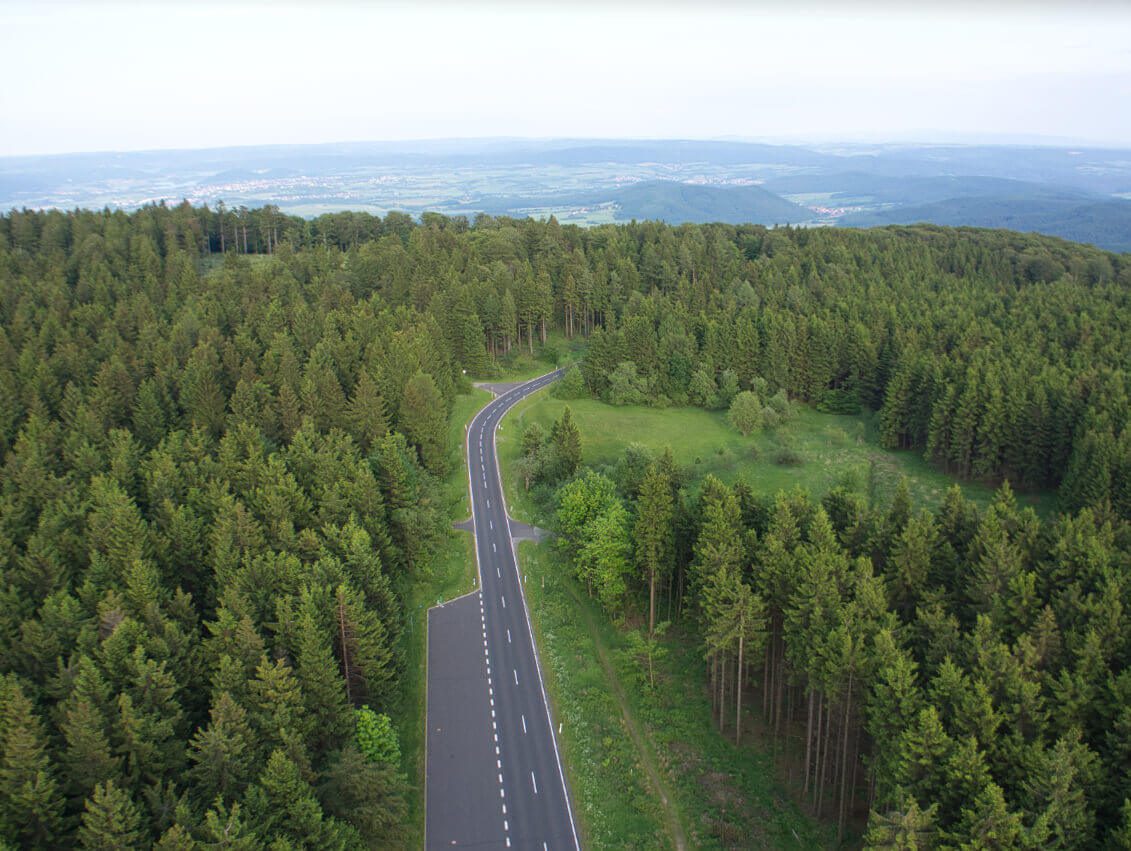
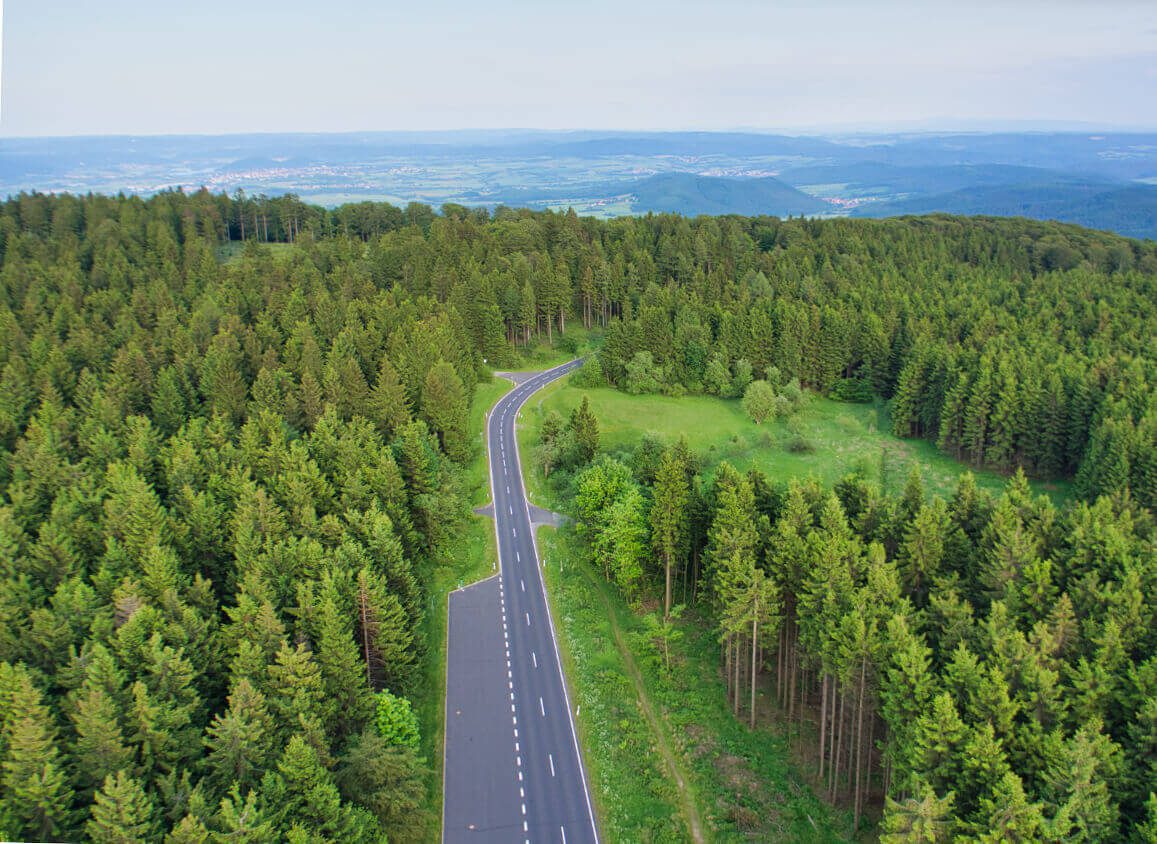
So far so good. So I grabbed an aerial photo (Sony RAW) that I took with my drone and handed it over to Photolemur (V 3). As usual, from my point of view the run was successful because it looked much better than before.
Then I exported the optimized image and thrown it back in. I've done this five times in total and the result is: Photolemur doesn't seem to be very clever in that regard, because with each run the colors became stronger and more unnatural.

Now you could say: Stupid program - but I think what counts is what comes out the first time. And there's nothing to complain about: the colors are good, the structure on the ground is much more recognizable than before and overall the photo has only benefited from the editing. And to break a lance for the software: the fact that Photolemur also distinguishes between faces, skin, eyes, vegetation and sky may not be "super-intelligent", but it's a lot smarter than most of the "AutoCorrect" buttons I've used in popular Adobe programs so far.
Sample photos and test results
Now that you've had to read quite a bit of text, I think it's time for some before and after photos. I have deliberately chosen photos that may not be the best in terms of composition, but represent interesting challenges for the image enhancement software. So, let's go!
Removal of image noise
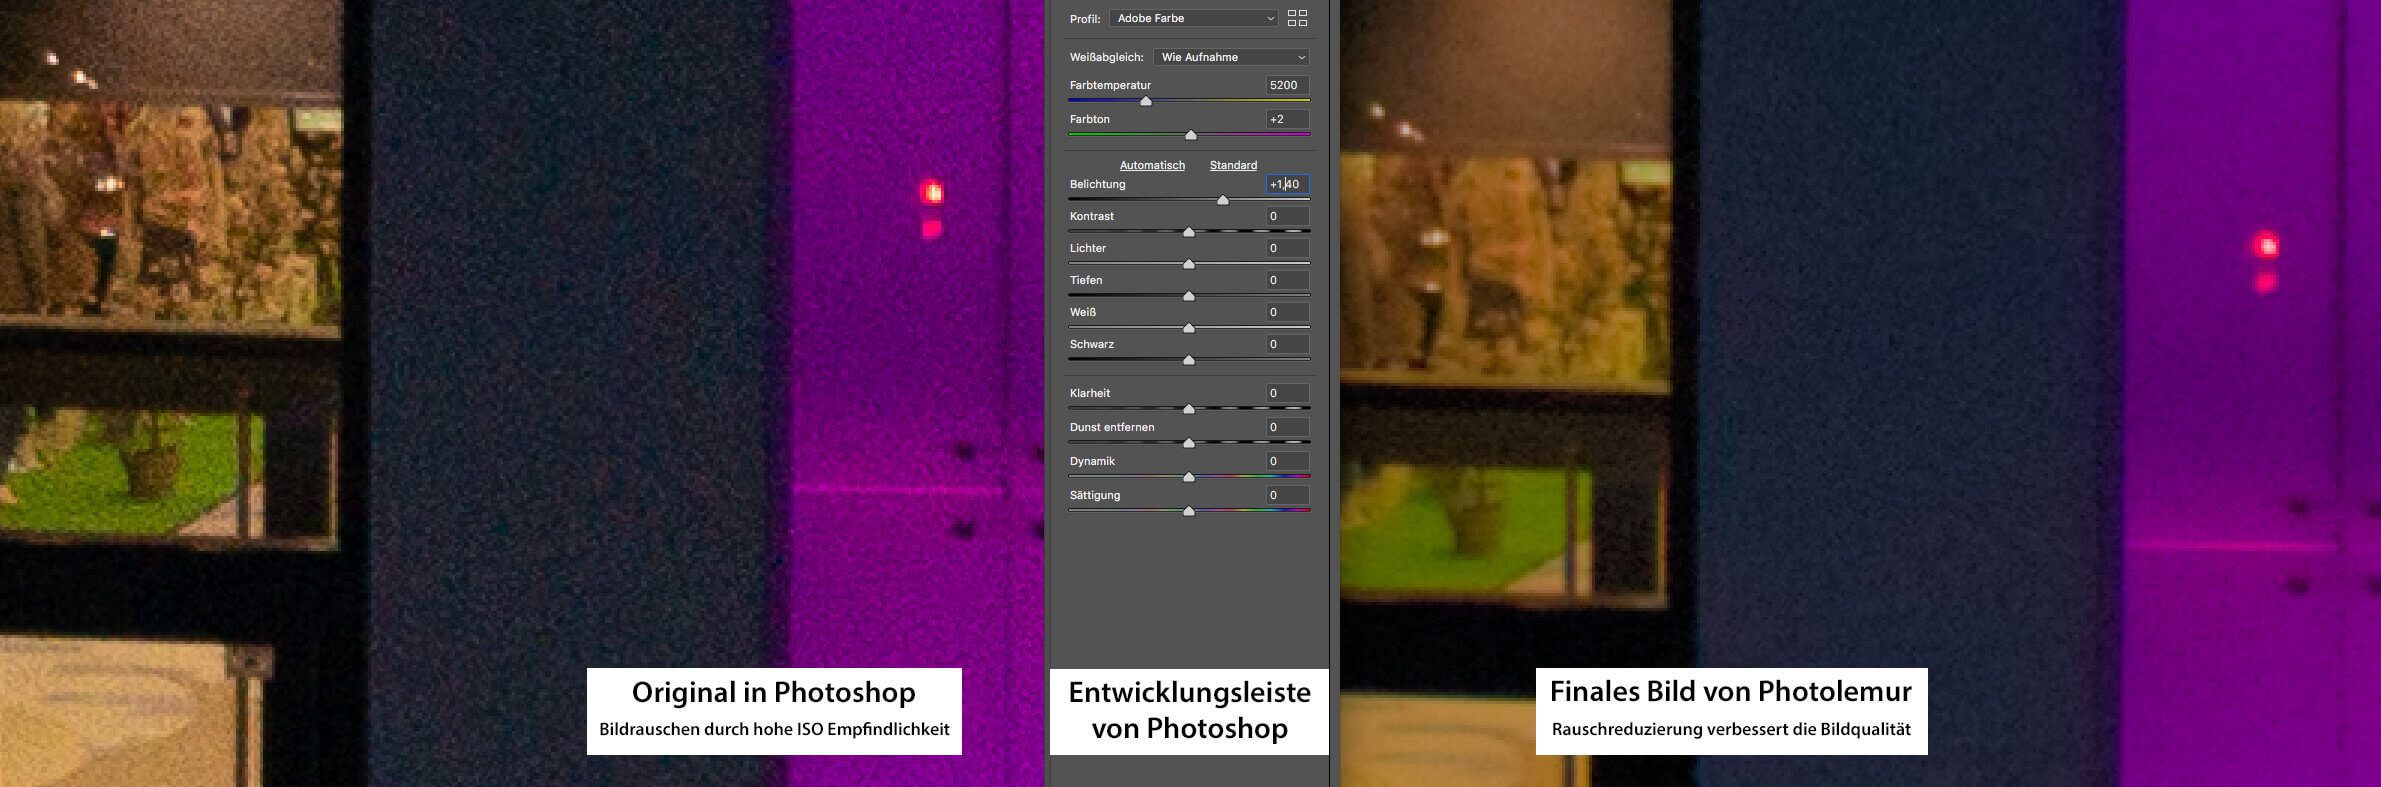
Right at the start I got a RAW from my Sony alpha NEX 7 (on the drone), which I took with a high ISO number in order to get a short exposure time of 1/250 despite the darkness. Of course, I'm particularly interested in what Photolemur can do in terms of noise reduction. To have a comparison, you can see a 300% enlargement of a section here. In the right area of the image is the picture from Photolemur and in the left the photo in the development window of Photoshop, where I only adjusted the exposure so that the brightness of the two images is about the same. You can see very clearly that Photolemur is doing a good job here.
Optimization of “underexposed” RAW photo data
The big advantage of RAW files is that you can heavily underexpose and still get a good picture out of it. Although "underexposing" is actually a wrong expression, because the exposure is only carried out during the "development" of the RAW. Despite everything – I tried out what Photolemur 3 makes of it with the image already used above:
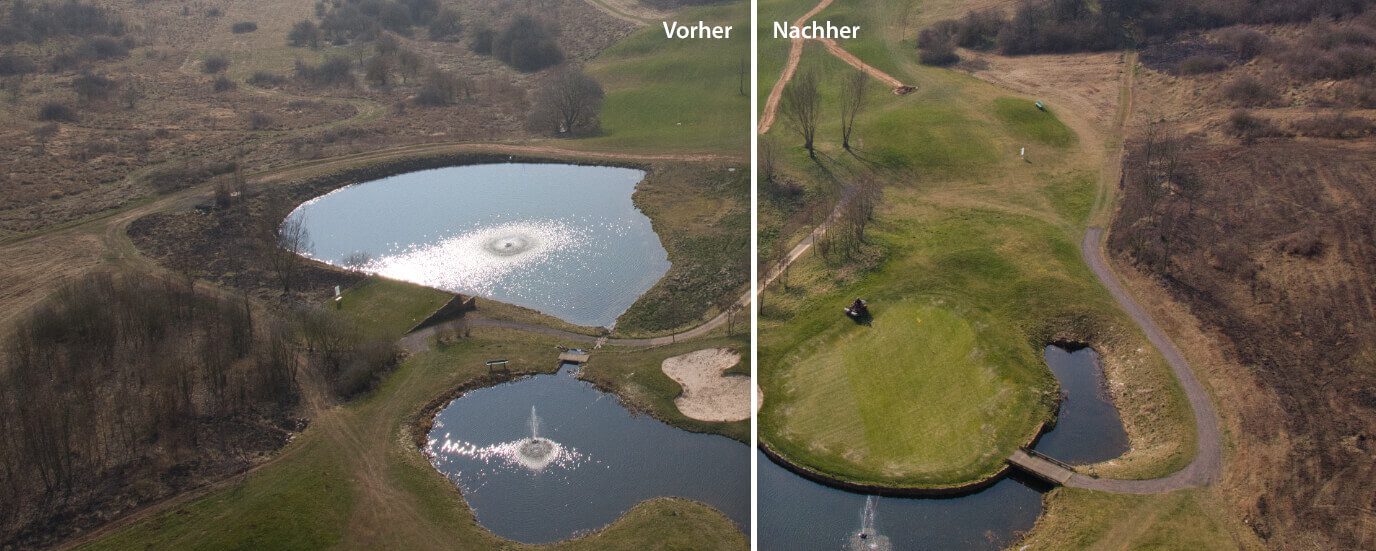
Green space optimization
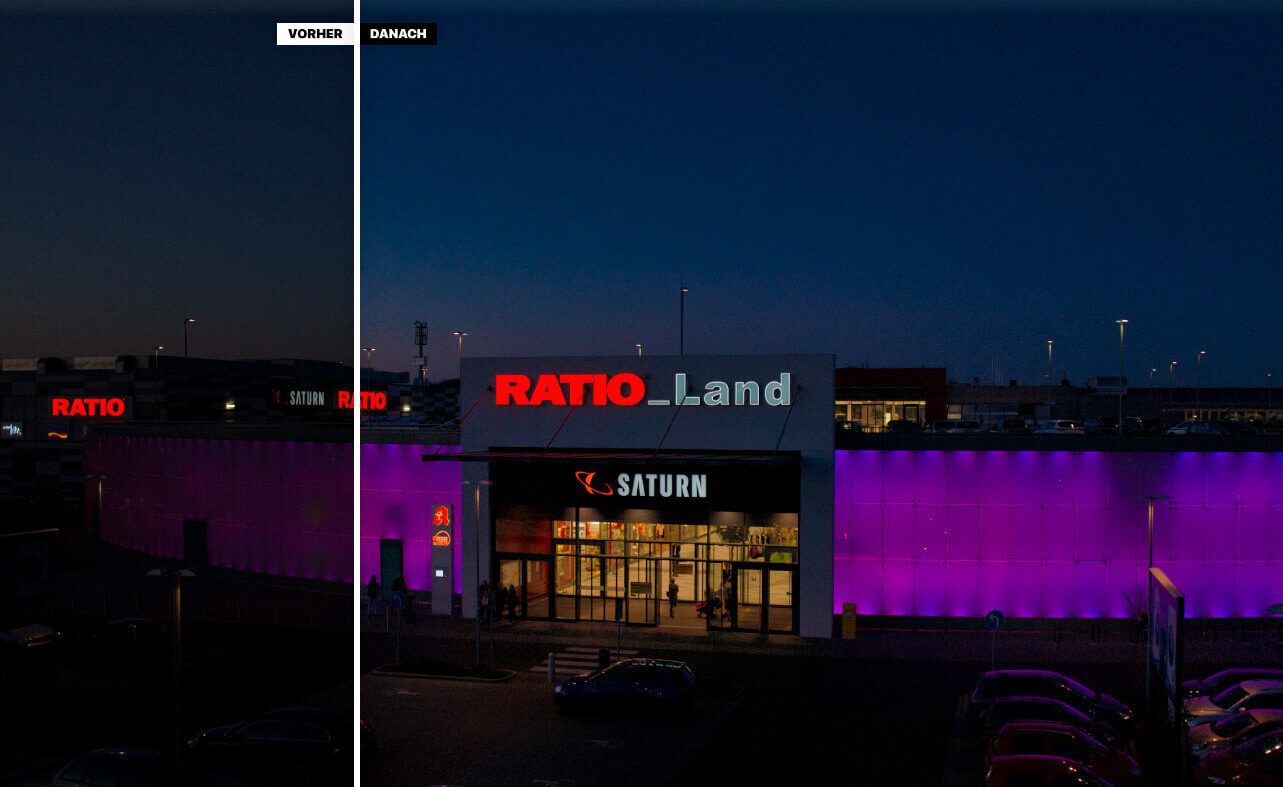
I'm a fan of landscape photos, which is also reflected in my photo collection. Among them you can also find photos of a golf course that I photographed from above at the very beginning of my “drone career”. Unfortunately it was early in the year and all the trees and bushes were still leafless. However, I chose the photo anyway, because on the one hand you can see how the green tones are greatly improved by Photolemur and on the other hand there is a section of the horizon further down, which reveals some improvement in the foggy area.
Dehaze: Automatically remove haze
Another auto filter that Photolemur applies specializes in removing haze in more distant areas of the image. Such veils of haze usually appear towards the horizon and are removed in other image processing programs with a so-called “dehaze” filter.
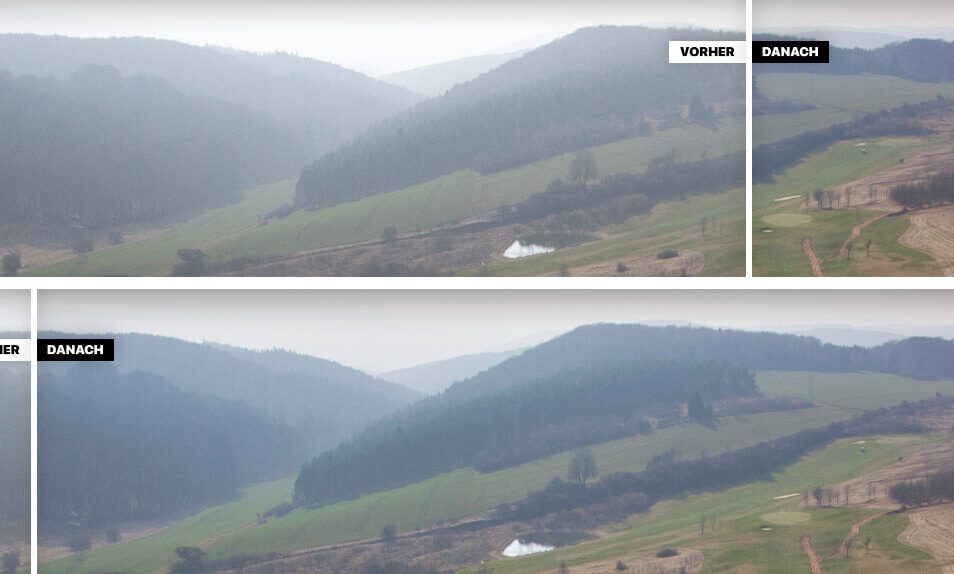
At first glance you might only see a few differences, but if you look at the forest areas, you can see that they have been given more contrast and detail. Dehaze is certainly one of the less "effective" filters in Photolemur's arsenal. Nevertheless, a nice-to-have for landscape shots.
Improvement of vegetation
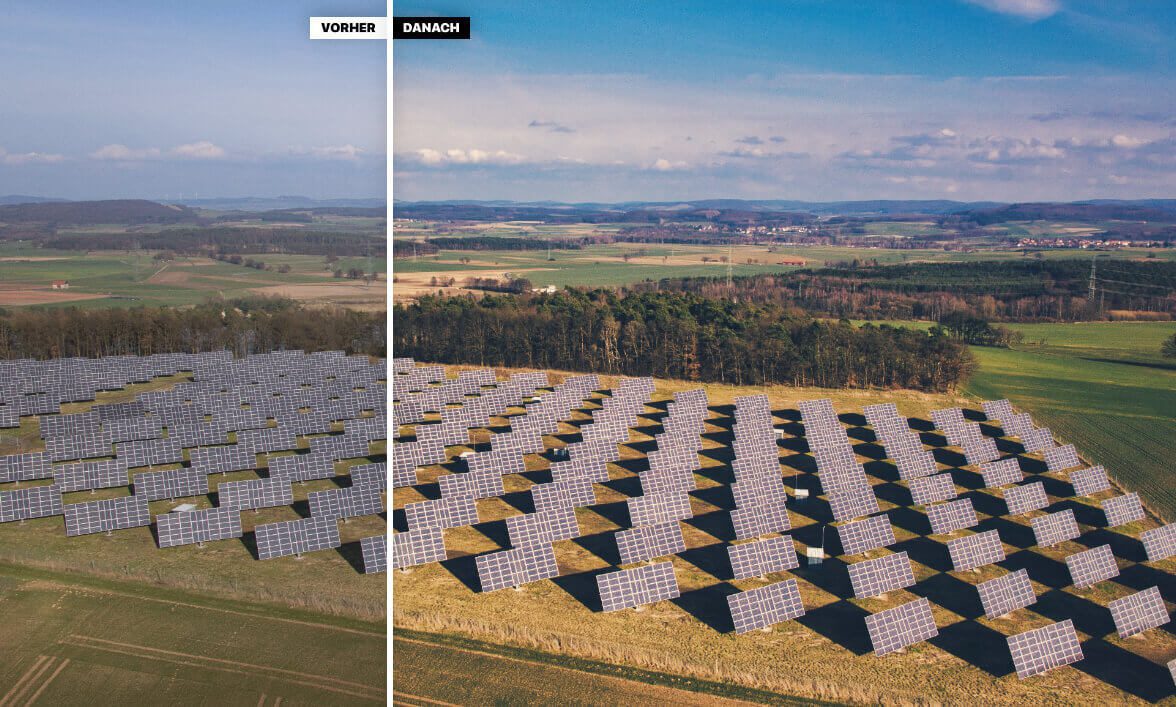
Another specialty is the “Improving vegetation” filter. This helps meadows, leaves, shrubs and trees to have more presence. I have a photo that looks relatively dull without this filter. It was also shot with my drone and the NEX 7 in Sony RAW format. I have put the complete photo here once unedited and once edited, so that you have a complete comparison. I think you can see an extreme difference in the effect of the two photos.
In this photo, in addition to the vegetation optimization, the dehaze filter also takes effect in the background: While the first has a rather washed-out and too bright sky and horizon, the second photo has more color in the sky - even if it is only a hazy sky. Unfortunately, the weather was not particularly good that day. But the second photo is a clear improvement on the original material.
Another tip for improving the sky: If you have photos that have a blown sky because it has become too bright, Photolemur can no longer do anything either. For this reason one should always try to "underexpose" rather than "overexpose". You can get something out of photos that are too dark. But this applies to all image editing programs and not only to Photolemur.
Eye enlargement and beautification
To take a look at the new function of eye optimization in the photo, I took a photo from the archive in which a lot of eyes can be seen. The child was made up, so you can still see a bit of color around the eyes. ;-)
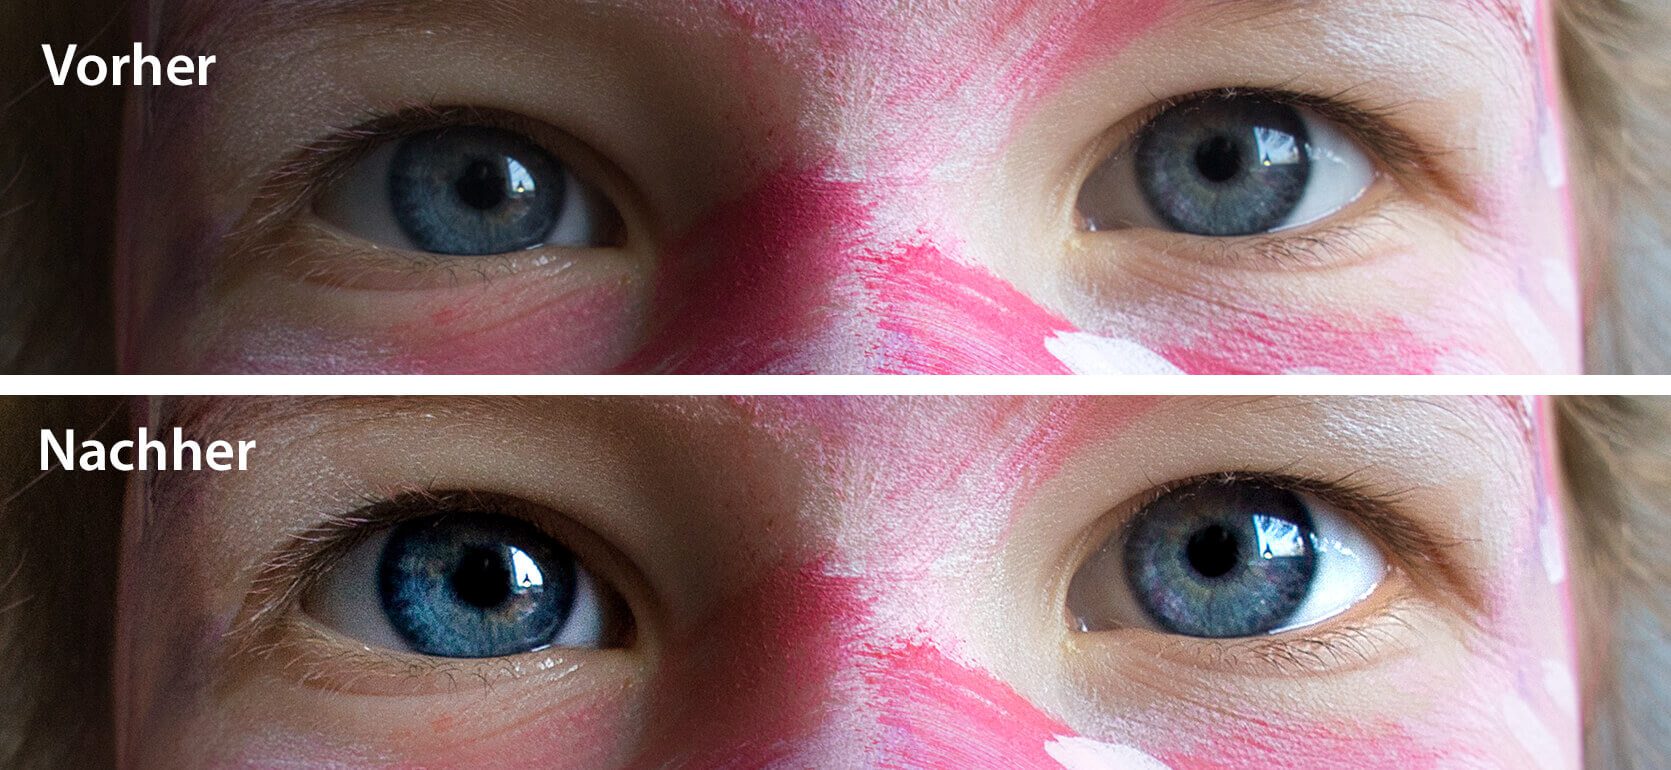
I think the automatic revision of the eye area was successful here. When you see the difference, you could almost say "too well done", because if you enlarge children's eyes anyway, it may be a bit too much of a good thing.
In any case, Photolemur recognized and processed the eyes here. Sometimes I didn't see any effect on other photos either. I think this may be because the software no longer recognizes eyes in certain images if half the face is covered with a scarf. Whether the eye improvement works or not currently seems to be a little bit dependent on chance. This should definitely get better with further updates.
Optimization of the skin and teeth
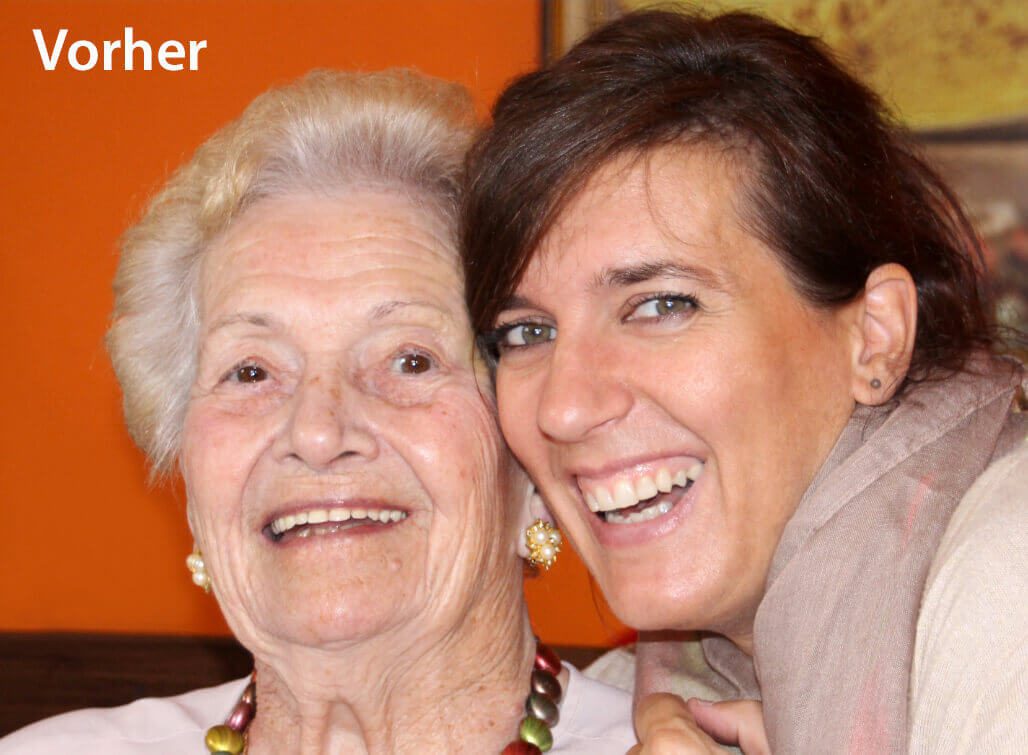
According to the product description, skin retouching and teeth whitening is also a feature that only came with the 3rd version of Photolemur. In order to test the effect of these filters, I have downloaded various photos from Pixabay (I do not have the photo approval of people I photographed in my photos) and would like to present an image here. The photo is from the user “Geralt” on Pixabay.
In the left area of the photo you can clearly see image noise and the wrinkled skin, while both have been cleaned up on the right. The wrinkles were of course not removed, otherwise the photo would no longer look realistic. What unfortunately didn't work well is teeth whitening. I assume that the software had problems with the detection here again.
Teeth whitening works!
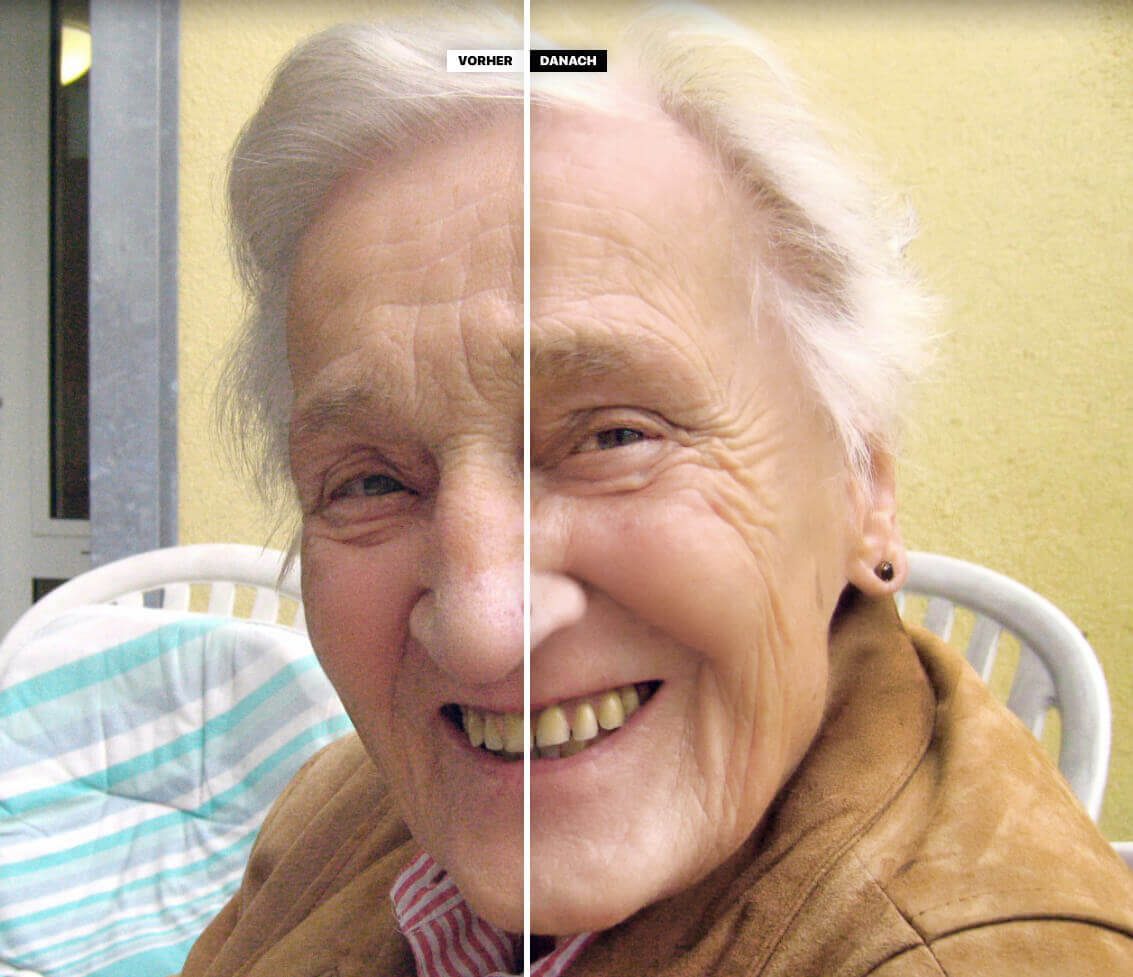
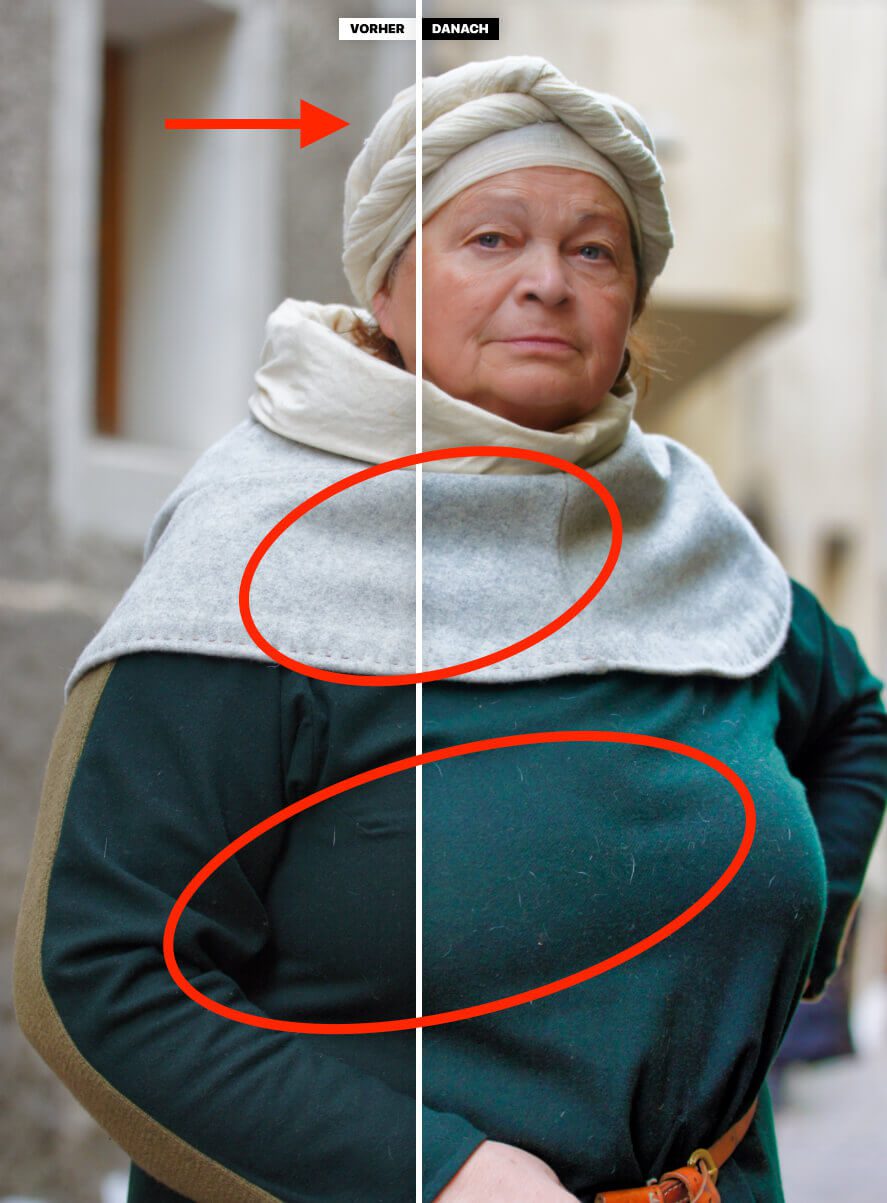
With another photo (photographer: TaniaVdB / Pixabay) it works much better with the teeth whitening. I have also completely built in the before and after pictures for you so that you can see the difference. The picture is a good test object, as the original was probably very little reworked by hand.
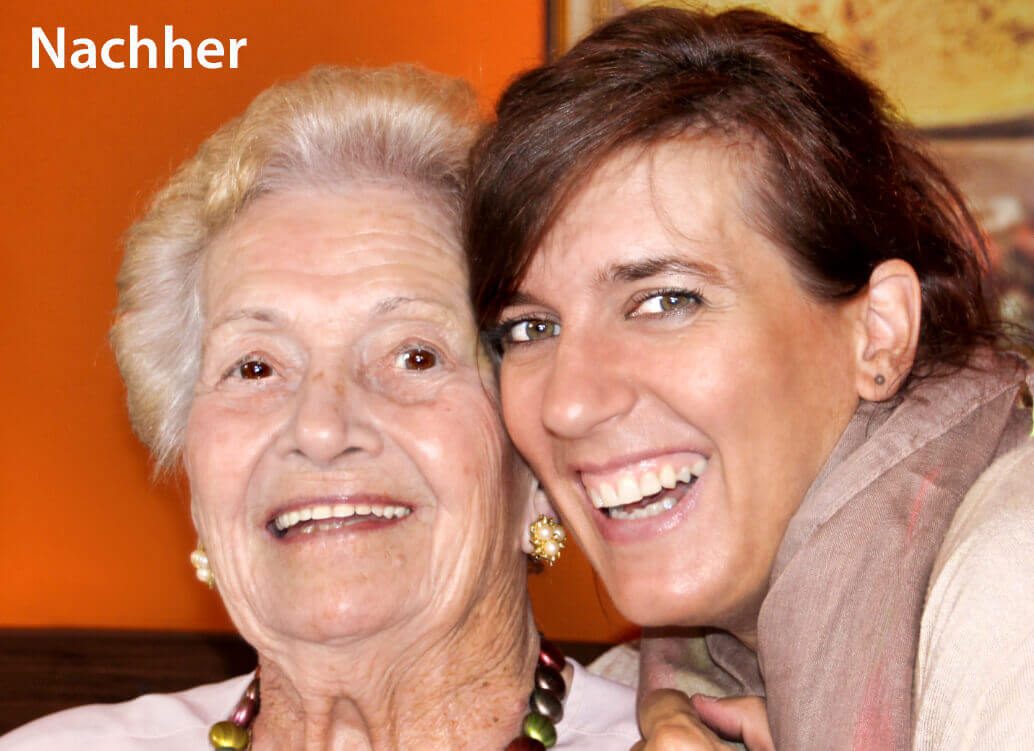
And the photo afterwards: teeth whitening, eye enlargement in the older lady and skin retouching can be clearly seen here. You have to look carefully at the separate photos to see the differences. If you use the before and after slider in Photolemur, you can see the improvements much faster. What is noticeable here in the picture, besides the teeth whitening and skin optimization, is the whites of the eyes that have been lightened. This makes them look much more shiny than in the original photo.
Photolemur 2 and 3 in speed comparison
The improvements in image processing and image quality can be clearly seen between version 2 and 3. What I'm still interested in, however, is the speed at which Photolemur works. For this purpose, I imported 2.3.1 .ARW files (RAW data) into version 3.0 and version 10, each about 25 MB in size.
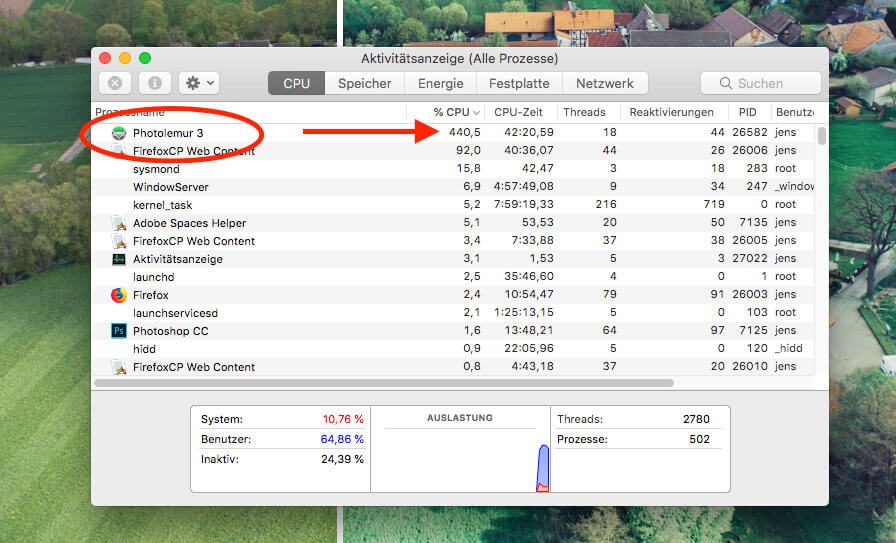
Important note: If you drag the photos onto Photolemur, they will be displayed directly in the overview and you can work with the program. Nevertheless, the software carries out calculations in the background in order to calculate the optimized thumbnails. the Activity indicator shows me values in the "CPU" tab where Photolemur comes to about 400-500% until the thumbnails are all calculated. For the measurement, I waited until Photolemur only accounts for a few percent of the CPU load in the activity monitor.
Here are the measured values of my stopwatch when calculating the thumbnails in the overview:
- Photolemur 2.3.1 - Import of 10 RAW files: 2:20 min
- Photolemur 3.0 - Import of 10 RAW files: 2:36 min
Speed when exporting to the hard drive:
- Photolemur 2.3.1 - Export of 10 RAW files: 2:55 min
- Photolemur 3.0 - Export of 10 RAW files: 3:28 min
Surprisingly, Photolemur 3 is slower here than the previous version. On the one hand, I would blame this on the fairly fresh version (3.0 preliminary version), in which no speed optimizations have probably been carried out in the code. On the other hand, the additional features that were added in the 3-series version are likely to contribute to the slowdown. I firmly expect that the software will also get faster in the next versions. That was the case again and again with the last updates of the 2-series version.
The styles - currently useless
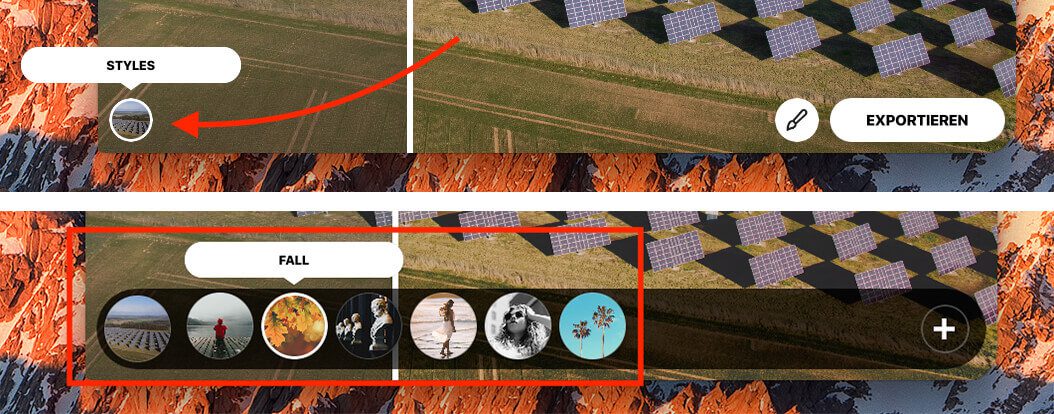
What I would like to briefly address is the style button, which you can now see in the detailed view of a photo. If you click on it, seven presets open that can be applied to the image. So far so good. The only problem is: if I click on one of these presets, Photolemur calculates another 11 seconds on my photo until I can see the result. In any case, it has to be faster, or it has to be calculated in the background so that waiting times are minimized. Otherwise, the real purpose of the software - namely fast, automatic photo processing - is reduced to absurdity.
You can also add new styles to the styles using the “+” button, but unfortunately I didn't manage to find any for Photolemur on the Skylum page. I assume there will always be new downloads on the website in the future. A nice feature would also be if you had more influence on the styles, for example to be able to customize an existing style. But that's certainly a feature that Skylum will plan more in the future.
I just asked Skylum about the possibility of adding additional styles. The team has confirmed to me that this will be possible in the final version. It just doesn't work in the current pre-release version that I'm testing.
My points of criticism
In addition to all the praise for the ease of use and the beautiful results, I would also like to express criticism, which the Skylum team will hopefully take to heart in order to improve the usability of the program in the future.
- Window size in the detail view cannot be adjusted: Unfortunately, if you open a photo in the detailed view, you cannot enlarge or reduce the photo window. You can only change the size of the main window and the size of the next detail window that you open is based on this. Unfortunately, this is very annoying in practice, as the program does not remember the size of the main window either when it is closed and reopened.
- No magnifying glass for enlarged view: In the detailed view there is no possibility to look at details of a photo with a magnifying glass or similar. I often have RAW data with 6000 x 4000 pixels, which are then only displayed greatly reduced. In order to check details in the photo before exporting it would be helpful if you maybe had a 100% - or even a 200% view. Unfortunately, CMD and + also have no effect.
- No full screen: Unfortunately, there is no full-screen mode, as is common with other Mac apps. You can open the window to maximum monitor height with the + button at the top of the bar, but it is still not a full-screen view, which would be very helpful with large amounts of photos.
- Style calculations too slow: Trying out the style unfortunately takes a long time and once you have calculated the style, it unfortunately does not remember the view. If I switch back to a style that he has already calculated before, he unfortunately carries out the calculations all over again. Here you could safely work with a cache and then switch back and forth faster.
- Plugin for the photos app: A plugin for Apple's Photos app would be great to revamp the photo library. If you could then improve photos album by album in batch processing, it would be a dream.
Criticism of the corrections by Photolemur
You can see: the above-mentioned points of criticism are all related to the usability of the software and not to the results obtained with the photos. From my point of view, the only criticism that could be made of Photolemur in terms of photo optimization is that the individual corrections cannot be made selectively. In the example photo below, the color optimization and the face optimization would be good, but the sharpening too much. But when you start to display all these filters with sliders in order to be able to adjust them individually, the software moves away from its actual focus: automation, which makes it possible to edit many photos in a short time.
For this reason, these individual cases, which do not look as good as before after processing, may have to be dealt with in another program or the entire optimization must be somewhat weakened with the slider that determines the effect of Photolemur.
My conclusion: Is Photolemur 3 worth it?
There is no question that you can get a lot more out of your photos with Luminar or Lightroom. With one or the other picture I would certainly do that to get a special mood or to emphasize certain picture elements more. Photolemur cannot - and does not want to - offer all of this. Those who like to play with the controls in Lightroom or Luminar, edit image areas individually with the correction brush and invest a lot of time in post-processing photos, will certainly not belong to the target group of Photolemur.
However, I fit in completely with the people for whom Photolemur is made: I like taking photos and a lot, but at the end of the day I don't have the time and the muse to spend a long time working on the image processing to improve the image quality. Almost all of my photos are unprocessed in the photo library and the photos that I actually use somewhere on a website were not edited for long, but rather quickly sent by Photolemur. In 95% of the cases, something better comes out afterwards than I put in.
Admittedly: With a few photos (<5%) the colors become too unnatural or other corrections such as exposure compensation or sharpening are not good for the subject. These individual cases cannot be avoided with automatic image optimization, which is simply in the nature of things.
I can definitely recommend Photolemur to all those who don't feel like taking 500 photos in Lightroom or Luminar after their vacation and prefer to choose automated image processing. But even for small amounts of photos, such as the folder with photos for the next photo book, can be improved with Photolemur without much stress. You only have to plan a little computing time for the computer, because it has to do all the work after all. If the Mac is just digging through the photos, I'll go get a coffee, because with the CPU load that Photolemur generates, you don't want to work on other things in parallel.
Demo version and discount code available
Basically, when you buy Photolemur, you have a 30-day money-back guarantee that you can use without giving a reason. But if you still want to play with Photolemur for a short time without making a payment, you can load the demo version and edit a few photos with it.
If the purchase of the program is then interesting, remember the coupon code "SYRAPPLE LOT“. With this you get (without time limit!) Whole 30% discount when buying any license. Incidentally, the code applies in addition to other discounts such as Halloween, Black Friday or Cyber Monday. ;-)
► Order directly from SKYLUM: Photolemur 3 ◄
Related Articles
 AltStore in the test: iPhone sideloading (and game emulation) tried out
- 5 app recommendations in April 2024
- Apple iWork 14.0 – Updates for Pages, Numbers and Keynote
- MacPaw releases revised ClearVPN offering
- Epic Games Store announced for iOS and Android
- Adobe alternatives: replacement for Premiere Pro (and partly After Effects)
- Download Apple iLife: Sources for old software and more
- [solved] Affinity Photo: Brush does not paint opaquely despite 100% opacity and hardness


![[solved] Affinity Photo: Brush does not paint opaquely despite 100% opacity and hardness](https://a391e752.rocketcdn.me/wp-content/uploads/2024/03/affinity-photo-pinsel-deckend-150x150.jpg)
Jens has been running the blog since 2012. He acts as Sir Apfelot for his readers and helps them with technical problems. In his spare time he rides electric unicycles, takes photos (preferably with the iPhone, of course), climbs around in the Hessian mountains or hikes with the family. His articles deal with Apple products, news from the world of drones or solutions to current bugs.
Hello SirApfelot
Can or is the family license usable for both Win and Mac? And will the raffle still take place at the time of the pre-release?
Hello Tom!
I once asked the manufacturer whether the licenses could be used for both types of computers. I think so because they sent me a license without asking if it should be for a Mac or PC. But I'll write here again when I have the binding answer!
And the raffle starts this Friday in the newsletter. On 12.9. I then draw the winner. The presale period isn't over yet. So you could still “buy” if you don’t win. I will then write to all participants to let them know.
Greetings!
So, short feedback: You can activate the family license on five devices - regardless of which operating system is running on it.
Thanks for the fixed feedback :-)
Well then I'll keep my eyes open who wins the software package :-)
SORRY, I bought the program. Unfortunately, I was not convinced by the image improvement results. The plug-in in Lightroom shows changes in the image, but the final image looks completely different (completely over-colored). Then it's still slow. So I'll stick with presets and hand adjustments. So, here it comes - despite the 30-day money-back guarantee and almost immediate notification that I want my money back, NOTHING will be refunded! The debt collection service provider refers to Photolemur and vice versa. Conclusion: Money away, program not really usable. I feel ripped off. DO NOT BUY THE PRODUCT !!!!!!!!!!!!!!
Hi Peter! It is a pity to hear that. For me, the program still does its job perfectly. If you agree with the money-back thing, I would take care of the support from the Photolemur guys. From my point of view, it does not work that I mention a money-back guarantee in the article, which then does not apply in practice. If you don't want me to comment negatively here in this article, then you should see to it that you get the money back. But I need your consent so that I can take care of those with your case. LG! Jens
Update on the case of Peter: He has now received the money back. So the money-back guarantee works. ;-)
Hello Peter,
the voucher does not work. You cannot enter the code anywhere when ordering. Or did I miss something?
LG Jogush
Hello Jogush! Thank you for your hint. I'll ask the store ... maybe you changed something in the ordering process! I'll write the message here as a comment!
Hallo,
the program is now free!
Hello Jörg! I've just looked at the site again, but there is only a time-limited trial version. The program itself still costs money if you want to use it permanently.
Caution, Photolemur 3 no longer works as a plugin for the Photos app under macOS “Catalina”!